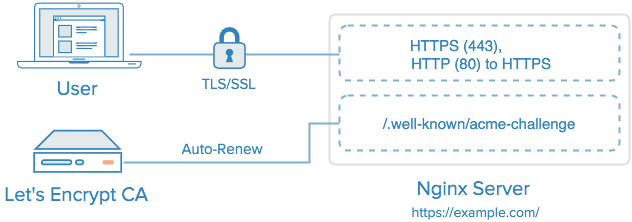
Let's Encrypt là một tổ chức phát hành chứng chỉ mới cung cấp dễ dàng để lấy và cài đặt các chứng TLS/SSL miễn phí qua đó cho phép mã hóa HTTPS trên các Webserver . Nó đơn giản hóa quá trình bằng cung cấp một phần mêm client "letencrypt" , phân mềm này tự động hóa hầu hết các bước được yêu cầu. Hiện tại toàn bộ quá trình lấy và cài đặt chứng chỉ hoàn toàn tự động chỉ trên các máy chủ Apache.Tuy nhiên Let's Encrypt có thể được sử dụng để dễ dàng có được một chứng chỉ SSL miễn phí, có thể cài đặt được bằng tay bất kể bạn chọn phần mềm Web Server nào.
Trong bài hướng dẫn này, tôi sẽ chỉ cho các bạn làm sao sử dụng Let's Encrypt để lấy một chứng chỉ SSL miễn phí và sử dụng nó cùng Nginx trên Ubuntu 16.04. Tôi sẽ chỉ cho bạn cách để tự động gia hạn chứng chỉ SSL của bạn.Nếu bạn chạy một Web Server khác chỉ cần làm theo tài liệu máy chủ của bạn để hiểu cách sử dụng chứng chỉ với thiết lập của bạn.
Chuẩn bị.
Trước khi làm theo hướng dẫn bạn sẽ cần một vài thứ.
Bạn nên có 1 máy chủ Ubuntu 16.04 cùng với một user non-root cùng quyền sudo.
Bạn phải sở hữu or kiểm soát tên miền đã đăng ký mà bạn muốn sử dụng cùng chứng chỉ.
Nếu bạn chưa có, hãy nhớ tạo một bản ghi A để trỏ tên miền của bạn đến địa chi IP Public của web server. Đây là yêu cầu bởi làm thế nào để Let's Encrypt xác định rằng bạn là chủ sở hữu tên miền mà nó đang cấp chứng chỉ cho. Ví dụ bạn muốn lấy chứng chỉ cho minhsys.tk , tên miền đó phải được phân giải đến server của bạn để quá trình xác nhận hoạt động. Thiết lập của tôi sử dụng cả 2 minhsys.tk và www.minhsys.tk làm tên miền, vì vậy cả 2 bản ghi DNS đều được yêu cầu.
Cài đặt.
1. Cài đặt Let's Encrypt Client.
Bước đầu tiên để sử dụng Let's Encrypt lấy chứng chỉ SSL là cài đặt phần mềm letencrypt lên máy chủ của bạn. Mặc dù letencrypt đã đổi tên thành cerbot , Client bao gồm trong kho chứa Ubuntu chỉ đơn giản là letsencrypt . Phiên bản này phù hợp với mục đich của chúng ta.
- sudo apt-get update
- sudo apt-get install letsencrypt
The
2. Lấy chứng chỉ SSL.letsencrypt client should now be ready to use.Letencrypt cung cấp nhiều cách để có thể lấy được chứng chỉ SSL thông qua các plugin khác nhau. Không giông như plugin Apache được trình bày trong một hướng dẫn khác, hầu hết các plugin chỉ giúp bạn lấy một chứng chỉ mà chứng chỉ đó bạn phải cấu hình thủ công cho web server của bạn sử dụng. Các plugin chỉ lấy chứng chỉ và không cài đặt chúng được gọi là "authenticators" bởi vì chúng được sử dụng để xác thực xem máy chủ có được cấp chứng chỉ hay không.
Chúng tôi sẽ chỉ cho bạn cách dùng plugin Webroot để có được chứng chỉ.
Làm sao để sử dụng Plugin Webroot.
Plugin Webroot làm việc bằng cách đặt một tập tin đặc biệt trong thư mục /.well-known bên trong thư mục root của bạn, có thể mở được (thông qua Web Server) của bạn bằng dich vụ Let's Encrypt để xác nhận hợp lệ, tùy thuộc vào cấu hình của bạn bạn phải cho phép truy cập vào thư mục /.well-known
Để đảm bảo rằng thư mục có thể truy cập được vào Let's Encrypt để xác nhân tính hợp lệ, chúng ta thực hiện một thay đổi nhanh chóng đối với cấu hình Nginx của chúng ta. Theo mặc định nó nằm ở /etc/nginx/site-available/default.
- sudo nano /etc/nginx/sites-available/default
Inside the server block, add this location block:
Add to SSL server block
        location ~ /.well-known {
                allow all;
        }
You will also want look up what your document root is set to by searching for the
root directive, as the path is required to use the Webroot plugin. If you're using the default configuration file, the root will be /var/www/html.
Save and exit.
Check your configuration for syntax errors:
- sudo nginx -t
If no errors are found, restart Nginx with this command:
- sudo systemctl restart nginx
Now that we know our
webroot-path, we can use the Webroot plugin to request an SSL certificate with these commands. Here, we are also specifying our domain names with the -d option. If you want a single cert to work with multiple domain names (e.g. example.com and www.example.com), be sure to include all of them. Also, make sure that you replace the highlighted parts with the appropriate webroot path and domain name(s):
- sudo letsencrypt certonly -a webroot --webroot-path=/var/www/html -d minhsys.tk -d www.minhsys.tk
After
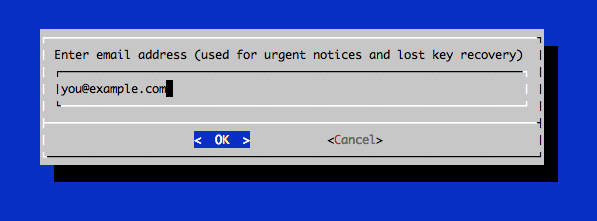
letsencrypt initializes, you will be prompted for some information. The exact prompts may vary depending on if you've used Let's Encrypt before, but we'll step you through the first time.
At the prompt, enter an email address that will be used for notices and lost key recovery:
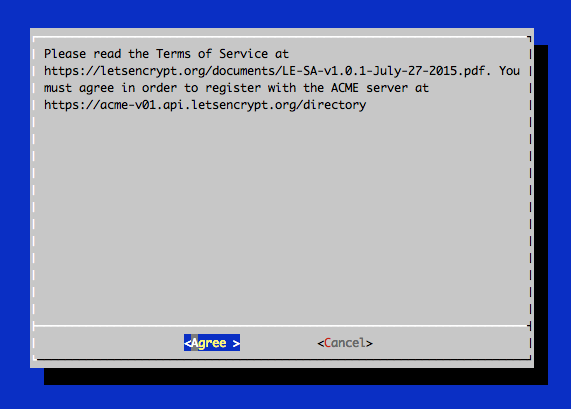
Then you must agree to the Let's Encrypt Subscribe Agreement. Select Agree:
If everything was successful, you should see an output message that looks something like this:
Output:
IMPORTANT NOTES:
 - If you lose your account credentials, you can recover through
   e-mails sent to sammy@digitalocean.com
 - Congratulations! Your certificate and chain have been saved at
   /etc/letsencrypt/live/example.com/fullchain.pem. Your
   cert will expire on 2016-03-15. To obtain a new version of the
   certificate in the future, simply run Let's Encrypt again.
 - Your account credentials have been saved in your Let's Encrypt
   configuration directory at /etc/letsencrypt. You should make a
   secure backup of this folder now. This configuration directory will
   also contain certificates and private keys obtained by Let's
   Encrypt so making regular backups of this folder is ideal.
 - If like Let's Encrypt, please consider supporting our work by:

   Donating to ISRG / Let's Encrypt:   https://letsencrypt.org/donate
   Donating to EFF:                    https://eff.org/donate-le
You will want to note the path and expiration date of your certificate, which was highlighted in the example output.
Firewall Note: If you receive an error like
Failed to connect to host for DVSNI challenge, your server's firewall may need to be configured to allow TCP traffic on port 80 and 443.
Note: If your domain is routing through a DNS service like CloudFlare, you will need to temporarily disable it until you have obtained the certificate.
Certificate Files
Sau khi lấy được chứng chỉ bạn sẽ các file .pem sau:
- cert.pem: Chứng chỉ domain của bạn.
- chain.pem : Chứng chỉ chuỗi Let's Encrypt.
- fullchain.pem: kết hopwk của cert.pem và chain.pem.
- private.pem: Khóa riêng chứng chỉ của bạn.
Điều quan trọng là bạn phải biết vị trí chứng chỉ đã được tạo ra. Các tệp tin được đặt trong thư mục con /etc/letsencrypt/archive . Tuy nhiên Let's Encrypt tạo liên kết đến /etc/letsencrypt/live/<domain_name> bởi vì các liên kết sẽ luôn trỏ đến các chứng chỉ gần đây nhất, đây là đường dẫn mà bạn có thể tham khảo các chứng chỉ của mình.
You can check that the files exist by running this command (substituting in your domain name):
- sudo ls -l /etc/letsencrypt/live/your_domain_name
The output should be the four previously mentioned certificate files. In a moment, you will configure your web server to use
fullchain.pem as the certificate file, and privkey.pem as the certificate key file.Generate Strong Diffie-Hellman Group
To further increase security, you should also generate a strong Diffie-Hellman group. To generate a 2048-bit group, use this command:
- sudo openssl dhparam -out /etc/ssl/certs/dhparam.pem 2048
This may take a few minutes but when it's done you will have a strong DH group at
/etc/ssl/certs/dhparam.pem.Step 3: Configure TLS/SSL on Web Server (Nginx).
Now that you have an SSL certificate, you need to configure your Nginx web server to use it.
We will make a few adjustments to our configuration:
- We will create a configuration snippet containing our SSL key and certificate file locations.
- We will create a configuration snippet containing strong SSL settings that can be used with any certificates in the future.
- We will adjust the Nginx server blocks to handle SSL requests and use the two snippets above.
This method of configuring Nginx will allow us to keep clean server blocks and put common configuration segments into reusable modules.
First, let's create a new Nginx configuration snippet in the
/etc/nginx/snippets directory.
To properly distinguish the purpose of this file, we will name it
ssl- followed by our domain name, followed by .conf on the end:
- sudo nano /etc/nginx/snippets/ssl-example.com.conf
Within this file, we just need to set the
ssl_certificate directive to our certificate file and the ssl_certificate_key to the associated key. In our case, this will look like this:
/etc/nginx/snippets/ssl-example.com.conf
ssl_certificate /etc/letsencrypt/live/example.com/fullchain.pem;
ssl_certificate_key /etc/letsencrypt/live/example.com/privkey.pem;
When you've added those lines, save and close the file.
Create a Configuration Snippet with Strong Encryption Settings
Next, we will create another snippet that will define some SSL settings. This will set Nginx up with a strong SSL cipher suite and enable some advanced features that will help keep our server secure.
The parameters we will set can be reused in future Nginx configurations, so we will give the file a generic name:
- sudo nano /etc/nginx/snippets/ssl-params.conf
To set up Nginx SSL securely, we will be using the recommendations by Remy van Elst on the Cipherli.stsite. This site is designed to provide easy-to-consume encryption settings for popular software. You can read more about his decisions regarding the Nginx choices here.
Note: The default suggested settings on Cipherli.st offer strong security. Sometimes, this comes at the cost of greater client compatibility. If you need to support older clients, there is an alternative list that can be accessed by clicking the link on the link labeled "Yes, give me a ciphersuite that works with legacy / old software."
The compatibility list can be used instead of the default suggestions in the configuration below. The choice of which config you use will depend largely on what you need to support.
For our purposes, we can copy the provided settings in their entirety. We just need to make a few small modifications.
First, we will add our preferred DNS resolver for upstream requests. We will use Google's for this guide. We will also go ahead and set the
ssl_dhparam setting to point to the Diffie-Hellman file we generated earlier.
Finally, you should take take a moment to read up on HTTP Strict Transport Security, or HSTS, and specifically about the "preload" functionality. Preloading HSTS provides increased security, but can have far reaching consequences if accidentally enabled or enabled incorrectly. In this guide, we will not preload the settings, but you can modify that if you are sure you understand the implications:
/etc/nginx/snippets/ssl-params.conf
# from https://cipherli.st/
# and https://raymii.org/s/tutorials/Strong_SSL_Security_On_nginx.html

ssl_protocols TLSv1 TLSv1.1 TLSv1.2;
ssl_prefer_server_ciphers on;
ssl_ciphers "EECDH+AESGCM:EDH+AESGCM:AES256+EECDH:AES256+EDH";
ssl_ecdh_curve secp384r1;
ssl_session_cache shared:SSL:10m;
ssl_session_tickets off;
ssl_stapling on;
ssl_stapling_verify on;
resolver 8.8.8.8 8.8.4.4 valid=300s;
resolver_timeout 5s;
# Disable preloading HSTS for now.  You can use the commented out header line that includes
# the "preload" directive if you understand the implications.
#add_header Strict-Transport-Security "max-age=63072000; includeSubdomains; preload";
add_header Strict-Transport-Security "max-age=63072000; includeSubdomains";
add_header X-Frame-Options DENY;
add_header X-Content-Type-Options nosniff;

ssl_dhparam /etc/ssl/certs/dhparam.pem;
Save and close the file when you are finished.
Adjust the Nginx Configuration to Use SSL
Now that we have our snippets, we can adjust our Nginx configuration to enable SSL.
We will assume in this guide that you are using the
default server block file in the /etc/nginx/sites-available directory. If you are using a different server block file, substitute it's name in the below commands.
Before we go any further, let's back up our current server block file:
- sudo cp /etc/nginx/sites-available/default /etc/nginx/sites-available/default.bak
Now, open the server block file to make adjustments:
- sudo nano /etc/nginx/sites-available/default
Inside, your server block probably begins like this:
/etc/nginx/sites-available/default
server {
    listen 80 default_server;
    listen [::]:80 default_server;

    # SSL configuration

    # listen 443 ssl default_server;
    # listen [::]:443 ssl default_server;

    . . .
We will be modifying this configuration so that unencrypted HTTP requests are automatically redirected to encrypted HTTPS. This offers the best security for our sites. If you want to allow both HTTP and HTTPS traffic, use the alternative configuration that follows.
We will be splitting the configuration into two separate blocks. After the two first
listen directives, we will add a server_name directive, set to your server's domain name. We will then set up a redirect to the second server block we will be creating. Afterwards, we will close this short block:
/etc/nginx/sites-available/default
server {
    listen 80 default_server;
    listen [::]:80 default_server;
    server_name example.com www.example.com;
    return 301 https://$server_name$request_uri;
}

    # SSL configuration

    # listen 443 ssl default_server;
    # listen [::]:443 ssl default_server;

    . . .
Next, we need to start a new server block directly below to contain the remaining configuration. We can uncomment the two
listen directives that use port 443. We can add http2 to these lines in order to enable HTTP/2 within this block. Afterwards, we just need to include the two snippet files we set up:
Note: You may only have one
listen directive that includes the default_server modifier for each IP version and port combination. If you have other server blocks enabled for these ports that have default_server set, you must remove the modifier from one of the blocks.
/etc/nginx/sites-available/default
server {
    listen 80 default_server;
    listen [::]:80 default_server;
    server_name example.com www.example.com;
    return 301 https://$server_name$request_uri;
}

server {

    # SSL configuration

    listen 443 ssl http2 default_server;
    listen [::]:443 ssl http2 default_server;
    include snippets/ssl-example.com.conf;
    include snippets/ssl-params.conf;

    . . .
Save and close the file when you are finished.
(Alternative Configuration) Allow Both HTTP and HTTPS Traffic
If you want or need to allow both encrypted and unencrypted content, you will have to configure Nginx a bit differently. This is generally not recommended if it can be avoided, but in some situations it may be necessary. Basically, we just compress the two separate server blocks into one block and remove the redirect:
/etc/nginx/sites-available/default
server {
    listen 80 default_server;
    listen [::]:80 default_server;
    listen 443 ssl http2 default_server;
    listen [::]:443 ssl http2 default_server;

    server_name example.com www.example.com;
    include snippets/ssl-example.com.conf;
    include snippets/ssl-params.conf;

    . . .
Save and close the file when you are finished.
Step 4: Adjust the Firewall
If you have the
ufw firewall enabled, as recommended by the prerequisite guides, you'll need to adjust the settings to allow for SSL traffic. Luckily, Nginx registers a few profiles with ufw upon installation.
You can see the current setting by typing:
- sudo ufw status
It will probably look like this, meaning that only HTTP traffic is allowed to the web server:
Output
Status: active

To                         Action      From
--                         ------      ----
OpenSSH                    ALLOW       Anywhere
Nginx HTTP                 ALLOW       Anywhere
OpenSSH (v6)               ALLOW       Anywhere (v6)
Nginx HTTP (v6)            ALLOW       Anywhere (v6)
To additionally let in HTTPS traffic, we can allow the "Nginx Full" profile and then delete the redundant "Nginx HTTP" profile allowance:
- sudo ufw allow 'Nginx Full'
- sudo ufw delete allow 'Nginx HTTP'
Your status should look like this now:
- sudo ufw status
Output
Status: active

To                         Action      From
--                         ------      ----
OpenSSH                    ALLOW       Anywhere
Nginx Full                 ALLOW       Anywhere
OpenSSH (v6)               ALLOW       Anywhere (v6)
Nginx Full (v6)            ALLOW       Anywhere (v6)
Step 5: Enabling the Changes in Nginx
Now that we've made our changes and adjusted our firewall, we can restart Nginx to implement our new changes.
First, we should check to make sure that there are no syntax errors in our files. We can do this by typing:
- sudo nginx -t
If everything is successful, you will get a result that looks like this:
Output
nginx: the configuration file /etc/nginx/nginx.conf syntax is ok
nginx: configuration file /etc/nginx/nginx.conf test is successful
If your output matches the above, your configuration file has no syntax errors. We can safely restart Nginx to implement our changes:
- sudo systemctl restart nginx
The Let's Encrypt TLS/SSL certificate is now in place and the firewall now allows traffic to port 80 and 443. At this point, you should test that the TLS/SSL certificate works by visiting your domain via HTTPS in a web browser.
You can use the Qualys SSL Labs Report to see how your server configuration scores:
In a web browser:
https://www.ssllabs.com/ssltest/analyze.html?d=example.com
This SSL setup should report an A+ rating.
Step 6: Set Up Auto Renewal
Let’s Encrypt certificates are valid for 90 days, but it’s recommended that you renew the certificates every 60 days to allow a margin of error. At the time of this writing, automatic renewal is still not available as a feature of the client itself, but you can manually renew your certificates by running the Let’s Encrypt client with the
renew option.
To trigger the renewal process for all installed domains, run this command:
- sudo letsencrypt renew
Because we recently installed the certificate, the command will only check for the expiration date and print a message informing that the certificate is not due to renewal yet. The output should look similar to this:
Output:
Processing /etc/letsencrypt/renewal/example.com.conf

The following certs are not due for renewal yet:
  /etc/letsencrypt/live/example.com/fullchain.pem (skipped)
No renewals were attempted.
Notice that if you created a bundled certificate with multiple domains, only the base domain name will be shown in the output, but the renewal should be valid for all domains included in this certificate.
A practical way to ensure your certificates won’t get outdated is to create a cron job that will periodically execute the automatic renewal command for you. Since the renewal first checks for the expiration date and only executes the renewal if the certificate is less than 30 days away from expiration, it is safe to create a cron job that runs every week or even every day, for instance.
Let's edit the crontab to create a new job that will run the renewal command every week. To edit the crontab for the root user, run:
- sudo crontab -e
Add the following lines:
crontab entry
30 2 * * 1 /usr/bin/letsencrypt renew >> /var/log/le-renew.log
35 2 * * 1 /bin/systemctl reload nginx
Save and exit. This will create a new cron job that will execute the
letsencrypt-auto renew command every Monday at 2:30 am, and reload Nginx at 2:35am (so the renewed certificate will be used). The output produced by the command will be piped to a log file located at /var/log/le-renewal.log.
Không có nhận xét nào:
Đăng nhận xét