[Centos][Load Balance][Failover] Hướng dẫn cài đặt Haproxy
Hướng dẫn cài đặt Haproxy
I.References
II.Cài đặt
1.Cài đặt bằng yum
- Download the EPEL repository RPM
wget http://dl.fedoraproject.org/pub/epel/6/x86_64/epel-release-6-8.noarch.rpm
- Install the EPEL repository RPM to add its Yum configuration file to your server.
rpm -ivh epel-release-6.8.noarch.rpm
- Install HAProxy
yum install haproxy
2. Cài đặt từ source
[Centos][Load Balance][Failover] Hướng dẫn cài đặt Haproxy
Hướng dẫn cài đặt Haproxy
I.References
- http://www.serverlab.ca/tutorials/linux/network-services/deploying-an-haproxy-load-balancer-on-centos-6/
- https://serversforhackers.com/using-ssl-certificates-with-haproxy
- https://www.haproxy.com/doc/aloha/7.0/haproxy/healthchecks.html
II.Cài đặt
1.Cài đặt bằng yum
- Download the EPEL repository RPM
wget http://dl.fedoraproject.org/pub/epel/6/x86_64/epel-release-6-8.noarch.rpm
- Install the EPEL repository RPM to add its Yum configuration file to your server.
rpm -ivh epel-release-6.8.noarch.rpm
- Install HAProxy
yum install haproxy
2. Cài đặt từ source
Chủ Nhật, 10 tháng 4, 2016
[Centos][Load Balance][Failover] Setup Keepalive
Hướng dẫn cài đặt Keepalive
I.References
- http://tecadmin.net/ip-failover-setup-using-keepalived-on-centos-redhat-6/#
- http://kaivanov.blogspot.com/2012/02/building-ha-load-balancer-with-haproxy.html
- http://www.keepalived.org/pdf/UserGuide.pdf
- http://blog.unicsolution.com/2015/01/kamailio-high-availability-with.html
II.Tutorial
Kịch bản Network:
  1. LB1 Server: 192.168.10.111 ( eth1 )
  2. LB2 Server: 192.168.10.112 ( eth1 )
  3. Virtual IP: 192.168.10.121
Bây giờ ta sẽ cài đặt IP Failover giữa 2 LB như sơ đồ dưới:
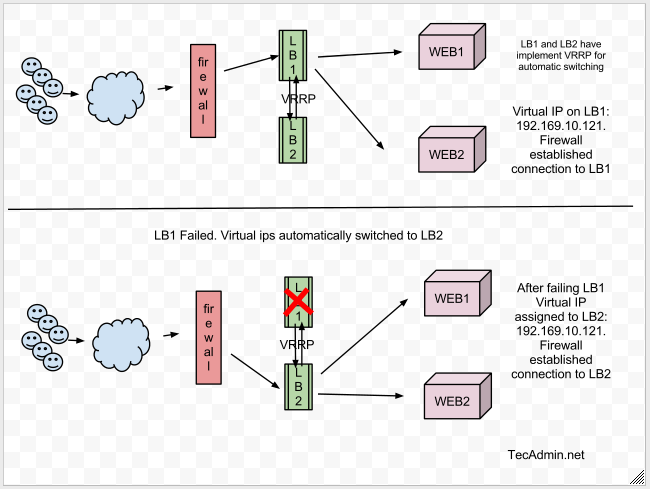
Thực hiện cài đặt Keepalive lên cả 2 server LB theo hướng dẫn cài đặt sau.
1. Hướng dẫn cài đặt với Yum
Lưu ý: cài đặt keepalive cần sử dụng quyền root
a. Cài đặt các gói yêu cầu
a. Cấu hình trên LB1
c.Verify IP failover
# yum install gcc kernel-headers kernel-develb.Cài đặt Keepalive
# yum install keepalived
2.Cầu hình Keepalive
Cấu hình: vi /etc/keepalived/keepalived.conf
Thay đổi các tham số được highligt tương ứng với hệ thống của bạna. Cấu hình trên LB1
! Configuration File for keepalived

global_defs {
   notification_email {
     sysadmin@mydomain.com
     support@mydomain.com
   }
   notification_email_from lb1@mydomain.com
   smtp_server localhost
   smtp_connect_timeout 30
}

vrrp_instance VI_1 {
    state MASTER
    interface eth1
    virtual_router_id 51
    priority 101
    advert_int 1
    authentication {
        auth_type PASS
        auth_pass 1111
    }
    virtual_ipaddress {
        192.168.10.121
    }
}
b.Cấu hình trên LB2! Configuration File for keepalived
global_defs {
notification_email {
sysadmin@mydomain.com
support@mydomain.com
}
notification_email_from lb2@mydomain.com
smtp_server localhost
smtp_connect_timeout 30
}
vrrp_instance VI_1 {
state MASTER
interface eth1
virtual_router_id 51
priority 100
advert_int 1
authentication {
auth_type PASS
auth_pass 1111
}
virtual_ipaddress {
192.168.10.121
}
}
c.Note:- interface : tên của card physical network sẽ gắn VRIP, sử dụng command ip a
2: eth1:mtu 1500 qdisc pfifo_fast state UNKNOWN qlen 1000 link/ether 00:0c:29:6f:ed:60 brd ff:ff:ff:ff:ff:ff inet 192.168.10.111/24 brd 192.168.1.255 scope global eth1 inet6 fe80::20c:29ff:fe6f:ed60/64 scope link valid_lft forever preferred_lft forever
Trong ví dụ trên gắn vào card private, có name eth1.
- Edit Keepalived configuration file on LB2 and add following configuration. While making changes in LB2 configuration file, make sure to set priority values to lower than LB1. For example below configuration is showing 100 priority value than LB1 has it 101..
- Priority value will be higher on Master server, It doesn’t matter what you used in state. If your state is MASTER but your priority is lower than the router with BACKUP, you will lose the MASTER state.
- virtual_router_id should be same on both LB1 and LB2 servers.
- By default single vrrp_instance support up to 20 virtual_ipaddress. In order to add more addresses you need to add more vrrp_instance
3.Các lệnh Keepalive
a.Start Keepalive
# service keepalived start
# chkconfig keepalived on
b.Check Virtual IPs
Mặc định virutla IP sẽ được gán cho master server, trong trường hợp master down, nó sẽ tự động được assign cho slave server.Sử dụng command sau đây để xem việc gán virtual ip trên interface.
# ip addr show eth1
Ví dụ kết quả hiển thị như dưới:
2: eth1:mtu 1500 qdisc pfifo_fast state UNKNOWN qlen 1000 link/ether 00:0c:29:6f:ed:60 brd ff:ff:ff:ff:ff:ff inet 192.168.10.111/24 brd 192.168.1.255 scope global eth1 inet 192.168.10.121/32 scope global eth1 inet6 fe80::20c:29ff:fe6f:ed60/64 scope link valid_lft forever preferred_lft forever
- Shutdown LB1, IP tự động được gán sang server slave
# ip addr show eth1
- Start LB1, và stop slave server (LB2), IP sẽ được gán cho server master
# ip addr show eth1
- Xem log
# tailf /var/log/messages
Ex,kết quả show log
https://docs.oracle.com/cd/E37670_01/E41138/html/section_ksr_psb_nr.html
Nếu muốn check trạng thái của các tiến trình HA cần phải bổ sung đoạn script check status sau:
Mar 19 17:30:24 localhost Keepalived_vrrp[6958]: VRRP_Instance(VI_1) Transition to MASTER STATE
Mar 19 17:30:25 localhost Keepalived_vrrp[6958]: VRRP_Instance(VI_1) Entering MASTER STATE
Mar 19 17:30:25 localhost Keepalived_vrrp[6958]: VRRP_Instance(VI_1) setting protocol VIPs.
Mar 19 17:30:25 localhost Keepalived_healthcheckers[6957]: Netlink reflector reports IP 192.168.10.121 added
Mar 19 17:30:25 localhost avahi-daemon[1407]: Registering new address record for 192.168.10.121 on eth1.IPv4.
Mar 19 17:30:25 localhost Keepalived_vrrp[6958]: VRRP_Instance(VI_1) Sending gratuitous ARPs on eth1 for
III.Note
1.Verify IP Failover không hoạt động
>resovled: enable IP forwarding và add iptable 2 rule sau:https://docs.oracle.com/cd/E37670_01/E41138/html/section_ksr_psb_nr.html
 # echo "net.ipv4.ip_forward = 1" >> /etc/sysctl.conf
 # sysctl -p
  net.ipv4.ip_forward = 1
# iptables -I INPUT -i eth0 -d 224.0.0.0/8 -p vrrp -j ACCEPT
# iptables -I OUTPUT -o eth0 -d 224.0.0.0/8 -p vrrp -j ACCEPT
# service iptables save
2.Veriry IP Failover khi các tiến trình HA bị chậm treo hoặc die [4]
Trong cấu hình trên keepalive mặc định sẽ check trạng thái của server, nói cách khác keepalive chỉ chuyển IP virtual khi server die mà không check trạng thái của các tiến trình HA như HA Proxy hoặc Nginx load balancing.Nếu muốn check trạng thái của các tiến trình HA cần phải bổ sung đoạn script check status sau:
vi /etc/keepalived/keepalived.conf
Bổ sung script check status tiến trình:! Configuration File for keepalived vrrp_script chk_web { script "killall -0 /usr/sbin/haproxy" interval 1 weight 2 } global_defs { notification_email {sysadmin@mydomain.com support@mydomain.com } notification_email_fromlb1@mydomain.com smtp_server localhost smtp_connect_timeout 30 } vrrp_instance VI_1 { state MASTER interfaceeth1 virtual_router_id 51 priority 101 advert_int 1 authentication { auth_type PASS auth_pass 1111 } virtual_ipaddress {192.168.10.121 } track_script { chk_web } }
- Script check trạng thái running của haproxy
vrrp_script chk_web {
script "killall -0 /usr/sbin/haproxy"
interval 1
weight 2
}
- Script check trạng thái running của nginx
vrrp_script chk_web {
script "killall -0 nginx"
interval 1
weight 2
}
- Thêm đoạn track_script trong block vrrp_instance , trong đó chk_web là tên củavrrp_script
track_script {
chk_web }
Không có nhận xét nào:
Đăng nhận xét